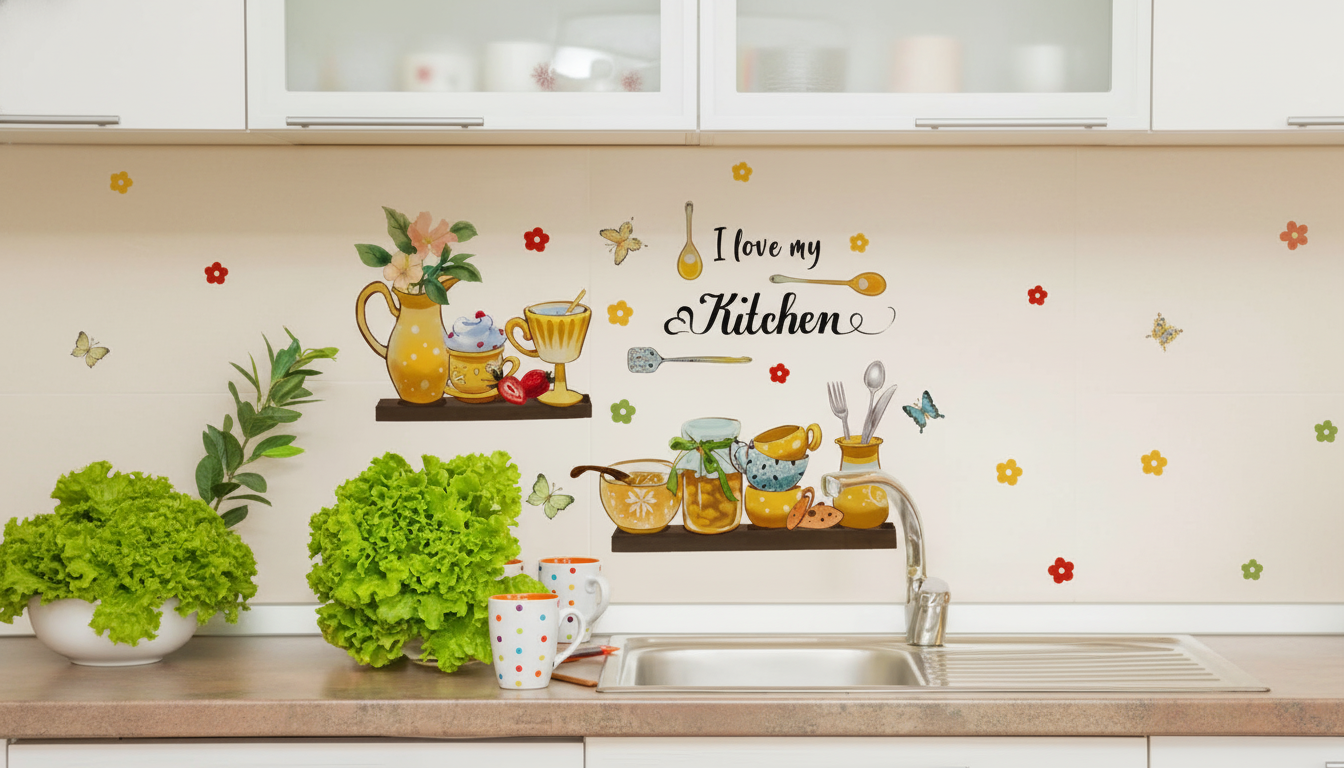
Add a bright, nature-inspired accent to kitchen tiles, backsplashes, and smooth walls without paint or grout work. Flower and butterfly vinyl tile stickers create a quick visual update for renters, busy households, or anyone wanting an easy seasonal refresh with minimal tools and cleanup.
A kitchen can feel “finished” when the surfaces around daily routines look intentional—especially the spots you see most, like the sink area or a coffee nook. A floral-and-butterfly motif brings a lighter, garden-inspired feel to backsplashes, breakfast nooks, and snack stations, helping brighten up neutral cabinets and countertops.
Because they’re peel-and-stick, vinyl tile stickers support quick updates with far less disruption than traditional tiling. They also shine in small zones: behind a kettle, around open shelving, or even along the side of a pantry cabinet where a little pattern goes a long way. If you’re unsure about committing to a permanent material or a bold color, they’re a budget-friendly way to test a new look first.
Placement matters for both looks and longevity. For the easiest maintenance, choose areas that get visual attention without constant heat or heavy mess.
Adhesion is won or lost in the prep step. A few minutes of cleaning and planning helps the stickers sit flatter, align cleaner, and stay put longer.
For general home product safety and handling reminders (especially if kids help with DIY projects), review CPSC safety education resources.
Start by measuring your target area (width and height), then decide whether you want full coverage or an accent band that runs behind key zones. If your kitchen is already busy with patterned counters or colorful accessories, a smaller “repeat strip” can deliver the refresh without visual overload.
| Area to Cover | Recommended Approach | Visual Effect | Notes |
|---|---|---|---|
| Behind sink (limited splash) | Partial panel centered under a window or shelf | Bright focal point | Keep edges straight; avoid seams near caulk lines |
| Coffee/tea station | Full-width band at counter height | Cohesive vignette | Leave room for canisters and appliance cords |
| Open shelf backdrop | Single row or checker pattern | Boutique display feel | Works best on smooth, matte surfaces |
| Pantry side/cabinet end | Vertical column of stickers | Tall accent that lifts the room | Align with cabinet edges for a built-in look |
A neat finish depends on alignment and pressure. Take your time on the first few stickers—once the pattern is set, the rest goes faster.
If you want a nature-forward refresh that feels cheerful without being permanent, Flower Butterfly Vinyl Tile Stickers – Beautiful Kitchen Wall Decor are an easy way to brighten kitchen and dining corners. The peel-and-stick format makes them practical for quick makeovers and easy seasonal switching—try a small accent set first, then expand across a larger area once you love the placement.
Adhesion is strongest on smooth, clean surfaces. Textured paint and heavily grooved tile reduce contact and can cause lifting, so it’s best to test a single sticker in an inconspicuous spot before committing.
Direct heat and frequent steam can shorten the lifespan and may lead to edge lifting. Place stickers away from burners when possible and use them in lower-heat backsplash zones, checking edges occasionally.
Warm the sticker gently with a hair dryer, then peel slowly at a low angle. Results depend on paint cure time and surface quality, so spot-test first and stop if you notice paint pulling.


Leave a comment